
The topic of today’s article will be how to paint the Black Orcs from Blood Bowl! The Black Orcs, together with the Bögenhafen Barons, are the two teams that make up the basic box of Blood Bowl, in the latest version that we saw together with an unboxing video some time ago, thanks to the friends of Ars Manufactorea.
This team is made up of aggressive orcs equipped with worn iron armor and thick leather fabrics, straps and masks with horns attached to their jaws. They look really aggressive! As you know, I’m not much of a player but it’s always a pleasure to deal with Blood Bowl miniatures. I love the not serious and very funny style of its setting and its characters.
In this article, we will see how to paint a Black Orc therefore, going to use the highlights a lot and the shaders very little. We will also see how to give a reflective and metallic effect to the armor, all in a fairly simple way to achieve.
How to paint Black Orcs from Blood Bowl: the primer
For this miniature, I chose a unique black background that I airbrushed, using Vallejo 73.602, which has a VERY opaque rendering. No Zenithal highlight this time then, because I need a black background to be used both for the shadows of the muscles, and as a base for the dry brush on the armor.
Dry brush: metal effect for the armor
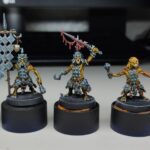
I started right from the dry brush, using 3 metallic colors of The Army Painter coming mostly from the metallic colours paint set: Night Scales, Rough Iron and Plate Mail Metal together with the Masterclass Moderate Dry brysh. Three very different colors, but which if used well can give different metallic shades to the armor, unlike the use of a single shade of silver.
Starting with the dry brush is recommended because it is the technique that tends to dirty the miniature the most, as can be easily understood. It is therefore useless to waste time with other details. I then started using the brush at the same time, smudging it with the first two darker colors, to give a unique background base. Clearly, all the armor must be brushed, from the large shoulder straps, to the chest and leggings.
Only at this point did I switch to the clearer Mail Plate Metal, to emphasize above all the more external parts exposed to light, in order to make it reflect. For this reason I try to brush in the opposite direction to the edges and edges, in order to make them stand out.
This is the result. I like it a lot, what do you think? Write it to me in a comment!

Not happy though, I wanted to emphasize some edges and simulate some scratches and dents on the armor, drawing them by hand with a very thin brush. Maybe what I used wasn’t that subtle, I wanted to make them less obvious, even more subtle.
Basic colors and layering, or glazes
Let’s start with the skin with a dark green of Vallejo, the same used for the Deathwing of the Dark Angels, and a brush of those that Da Vinci Brushes gave me but that I had not yet had the opportunity to use.
Here the goal is not to paint our ogre’s skin uniformly, but to create a base for the areas of light. I then painted only the most evident muscles, leaving the black in the lower part of the arms, in the inlets or near the armor, thus doing the work that usually does the shade in the classic painting style “base color, shade, highlight” which we had seen for Zombicide for example (LINK TO ZOMBICIDE JOHANNES).
Highlight the complexion
To highlight the complexion I used two colors: Citadel’s Death Guard Green and Yriel Yellow, putting a little of both on the wet palette to be able to create gradients starting from the basic Vallejo green. With the color diluted enough I started to create areas of light starting from the face and the muscles of the arms.
I went on like this by adding more and more yellow and lightening the color, reducing the area of action. For the leather parts, I used 4 different browns, all from Citadel. Here you can see them all, from left to right, from darkest to lightest. I then started by creating a dark base, leaving the black of the primer in the deeper interstices and recesses. As with the complexion, I went to create some highlights by lightening the color and reducing the area of action. With the same technique, in addition to the gloves, I also painted the straps and belts.
It is important here that the color is diluted and that the brush holds it well, so you can progressively create different layers, which will allow you to obtain the color gradients that give depth to the miniature. With the same base brown, Dryad Bark, I primed the nails, which I will then pass some simple Rakarth Flesh on to give a bone color. I jump a little from one side to the other in this phase, to keep the images in time sequence. Classic approach instead for pants, where I gave a fairly thin Steel Legion Drab base, then passing more than one layer.
As I told you with some Rakarth Flesh I highlighted nails and fangs, where I had given the same colors as the gloves. I always find it a bit difficult to paint spurs and fangs because being cylindrical, you have to be careful to pass the color on each side.
Let’s give some shade … even if not necessary!
The time has come to use the only shade of this miniature, and it could only be Agrax Earthshade. The approach will be to spread it uniformly only on the pants. More selective, on the other hand, on gloves, belts and in the recesses of the armor. Once dry, I went over with the base color the areas most exposed to the light of the pants, trying to bring out the muscles as the color is turned towards Ungor Flesh.
All that remains is to give color to the metal jaw, imagining it painted red, complementary to the green, will allow it to stand out considerably. In spreading the Khorne Red used as a base, I always tried to leave a black border between the various parts painted in red. With Mephiston Red I gave the highlight, as always by reducing the area of action, so that a gradient is created between black, dark red and this lighter one.