
Painting Necrons miniatures can seem very easy, given their apparent simplicity. In reality, creating shades and lighting effects, the core of the appearance of these miniatures, is not something to be taken lightly. In the past few weeks I have bought Warhammer 40,000 Indomitus from Ars Manufactorea, a model shop in Brescia, a northern town in Italy. Together with Ars we decided to make this video, although this was the first purchase we made from them. I therefore want to thank them for their availability and seriousness. I said “we did it” because my friend Fulvio put the pennies there with whom I shared the miniatures. To him the marines to me the Necrons. Where is the catch? He wants me to paint all the marines as Dark Angels… Dear Fulvio, you will never see your miniatures finished… know it!
Aside from that, I’ve painted the Necron Royal Warden in the past few days. So today more generally speaking, let’s see together how to paint Necrons.
How to paint Necrons
Necrons are currently the oldest race in the Warhammer 40,000 universe. Known initially as Necrontyr, theirs is a sad tale of betrayal, suffering and slavery. They were deceived by the C’Tans during the war against the Ancients, the so-called War in the Skies, and forced to live in bodies of living metal. Then they end up in a long sleep that lasted 60,000 years, before their awakening in the 41st century.
Necrons miniatures can be very difficult to paint if you start to give weight to reflections, objects that produce light and various shades. But with a good metallized, the right wash and a little drybrush, you can still get a discreet and presentable result on the playing field, without too much effort. However, today we will see a somewhat advanced approach, working quickly on an airbrush base and less quickly with glazing, trying as always to make everything easy enough for everyone.
STEP 1: Primer and color base with airbrush
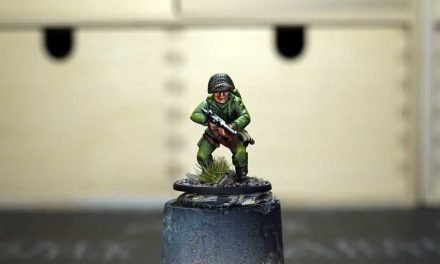
First, I assembled and based our Necron Royal Warden, using simple vinyl glue and two sprinkles of sand: first coarse, then fine. I decided to paint the basic colors with the airbrush, a bit like I did for the Blood Angels marine.
I then gave a black base primer, and then played with two shades of metallic silver, one dark and one light. I gave the color from the bottom and from the top to diversify the shades: dark at the bottom and light at the top. The two colors used are from The Army Painter and are respectively Gun Metal and Plate Mail Metal.
If you don’t have an airbrush, don’t worry. You can achieve the same effect using a brush, spreading the Gun Metal in the parts less exposed to light, and consequently the Plate Mail Metal in the most illuminated parts. It could also be an excellent opportunity to practice wet blending.
STEP 2: Apply basic colors with a brush
Prepared the color base, I went over some areas of black. I focused on the finer parts of the Royal Warden such as the shins, forearms and knees, but also some parts of the weapon.
I then used some Wizard Orb to which I added a tip of Matt Black and one of Crystal Blue. In this way I got a dark and cold green to use as a base for all the parts I intended to paint green. With this color obtained I colored part of the armor and the weapon, but also the various tubes, the eyes and the “hexagonal cloak”.
Wash and highlight
With some Dark Tone, a black wash, I continued to accentuate the shadows already outlined with the airbrush.
To finish the metal parts, I gave a coat of highlights with Shining Silver with a very thin brush, to go to illuminate the edges and the smaller parts exposed to light.
With some pure Wizard Orb, I made a highlight to all parts of the miniature that I had given the green base to. Particular attention should be given to the decorations on the chest, where I tried to collect the light in the central part of the two sides, and on the upper part of the hexagonal area.
STEP 3: the glazing technique
The time has come to work with the glazing technique to accentuate the light effects. Glazing is a technique that requires a lot of patience. It consists in diluting the color a lot and applying many layers in order to create color graduations that lead to a brighter and more vivid color. In this case, starting from the Wizard Orb just applied, we will use some Jungle Green as the first glaze, and then move on to Moon Dust, a very light yellow.
For this part of the video I used a few cuts. The goal was to try to let you see the whole process, in order to understand how this technique works. As you can see, I pass over and over again on the same point, with the color very diluted and the brush lightly loaded. At each step I try to reduce the area where the color resides in order to concentrate it where I want the miniature to be brighter.
Moon Dust is a very light color, at this point I will only need it to create the most extreme points of light, in very small areas of the miniature.
Black parts of the Necron Royal Warden: how to exalt them
After glazing the green parts of our Necron Royal Warden, I used Necromancer Cloak to light up the parts that we had previously brought back to black after using the airbrush. In doing so I gradually added some Ash Gray, much clearer, in order to create a kind of Non Metallic Metal effect.
Here, too, working with grays, the goal is to color those areas that are most exposed to light, so first it is necessary to understand how this affects the shapes of the miniature and use color only in those areas. In this regard you can review my old video on how to paint Megan from Zombicide which explains this process well.
The last thing to do to finish our Necron is to paint the bayonet blade with the same triad of The Army Painter colors used before. Different from tubes or armor for example, is that I accentuated the edge highlighting more with Jungle Green and Moon Dust. I then finished the miniature by coloring the base as well.
Conclusions on how to paint Necrons
With this article I hope I have given you a way to understand how to paint Necron miniatures, below you will also find the video that maybe can help you a little more.