'/%3E%3C/svg%3E)

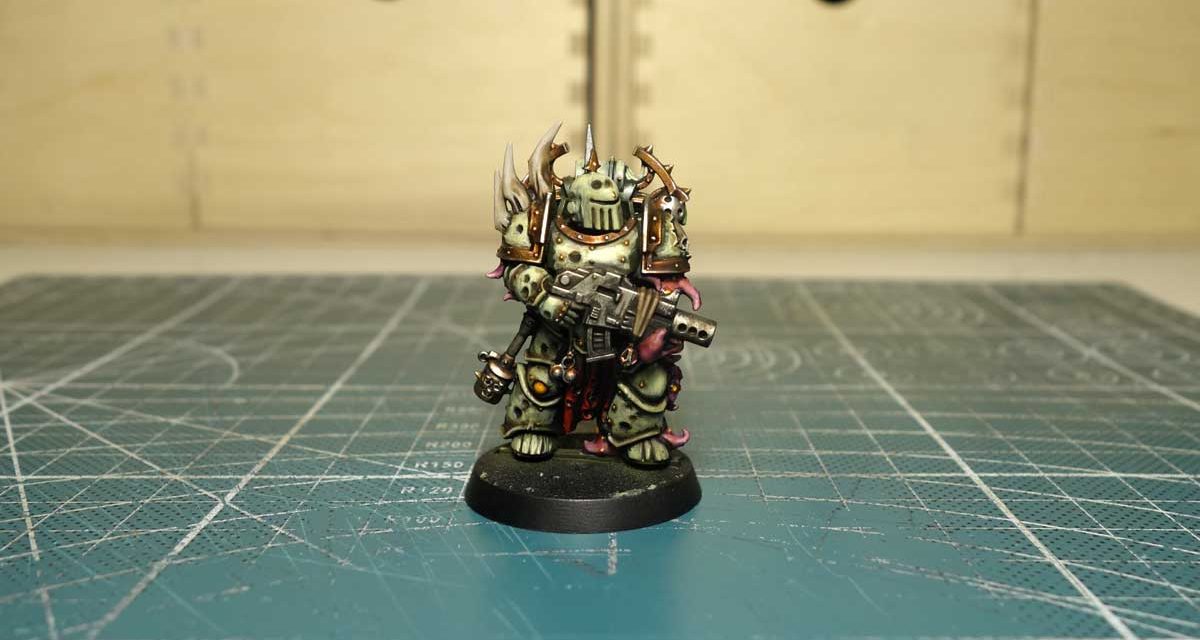
Painting the Death Guard is probably ideal for anyone who starts painting miniatures for the first time. The reason is easy to say: the dirty, rotten, putrefied style, to the delight of grandfather Nurgle, is in fact easier to create for those who are beginners, also because it is easier to camouflage mistakes than perhaps to a shiny Space Marine.
The Games Workshop color scheme includes a military green for the armor called Death Guard Green, to which a purple must be combined for the fabric parts. I preferred to make a custom scheme because I didn’t like the classic one very much. This new scheme provides for a lighter and more layered green and a red instead of purple, in fact two complementary colors. Let’s see together how to make it happen.
How to paint the Death Guard
To start painting this Death Guard marine, I used two shades as a color base: black primer and a Vallejo olive green. I first prepared the color in a plastic blister, then went to load the airbrush. I will not give green uniformly, but mainly from above, to give depth, and to the most affected areas, namely those of the armor.
Before I started painting, I washed the miniature with Shader, Athonian Camoshade, in order to accentuate the shadows even more. By doing so, it is possible to accentuate the shadows in the holes and inlets of the reinforcement. This will also allow me to better understand the volumes of the miniature, necessary to distribute the color and create light effects.
The main color I use for armor is The Army Painter‘s Necrotic Flesh. I try to keep it very diluted but without loading the brush excessively. In this way I go to “dirty” the armor with thin layers of color, keeping away from the edges.
I go on like this for several layers, going over again especially in areas where the light is greater, in this way the armor will seem more illuminated. You will have to go over the same points several times to make the color create different shades by overlapping. It is probably the longest step of the coloring process in this miniature, but the result will be a “dirty” coloring, which is well suited to these miniatures. Do not worry if in these passages a little color ends up in the coves and bullet holes, we will remedy it shortly.
Refine details and nuances
Setting the armor aside for a moment, I dedicated myself to the metal parts of the miniature. Here too I used a different color scheme, I had already told you how to create the copper effect for the Death Guard in a previous article.
One thing must be said: in giving the brown shader layer, I tried to create with this color a separation layer between the copper areas and the green armor. I then applied the color halfway between the two colors. In addition, I also applied the same shader on the coves, holes and joints of the reinforcement. In this way the shader will create a further shade of color to the green of the armor, giving depth. For bone parts, I used a Rakarth Flesh base. This phase could have been carried out earlier as after I will go to pass the brown shader again, working twice with the same color. Keep these phases in mind if you need to speed up your time more than having fun painting. As a final touch, I applied a coat of glossy paint to the pustules.
Paint the bumps and tentacles
Many Death Guard marines have protrusions and flaps of skin that recall a bit of octopus tentacles or the claws of crustaceans, in this miniature in particular they are clearly visible. As a base I gave a salmon pink, Citadel Tallarn Flesh. With the second coat, I added The Army Painter’s Lava Orange pink and Vallejo ivory white to the pink, thus giving the base color different shades. The shader cannot be missing in this case too. Druchii Violet is a purple shader that applied on salmon pink will form a strong contrast. The meat flaps are full of pustules and bubbles, to highlight them I used Yriel Yellow as the base color. Being a Citadel Layer color, it is sometimes better to give more thin hands. To give depth to the pustules, I used Carroburg Crimson, a “cherry” colored shader, thus going to turn red around the pustules.
Paint the bone parts of the Death Guard
As I said before, I have only now applied the shader to the bone parts … but oh well, let’s enjoy the moment. After all, ours is a relaxing hobby … I take this opportunity to ask you if you have ever painted a miniature of the Death Guard or if you have ever thought of using alternative color schemes compared to those promoted by Games Workshop. Do you prefer creativity or stick to the cover photos? Let me know in a comment.
Once the shader dried, I gave a thin coat of Rakarth Flesh, already used as a base, to the most extreme tips of the bone spurs.
Paint weapons
For the weapon, I gave a coat of silver with a dry brush, using an old brush. Also in this case I had to pick up the brown shader, this makes you understand how often to program well what you need to paint and do it before starting to paint, it can speed up times a lot.
Paint the shreds of cloth
We are almost at the end, now we have to paint the piece of fabric between the legs of our marine. As I said initially, the Games Workshop color scheme would have required a purple for this part, but I consider a red more appropriate to complement the green of the armor.
After a coat of black then, I gave a first layer of Khorne Red, painting only the most illuminated parts of the cloth, leaving the black in the inlets. This way you won’t need to use a shader for this part of the miniature. Proceeding in layers, reducing the area of interest, I lightened the parts in red with increasingly bright shades of red.
Paint the Death Guard slime
As a final touch, we are going to paint the slime, typical of the Death Guard, which runs from the back of the miniature, the procedure is the same as we saw in a previous article. For these effects Games Workshop offers a ready-made technical color, Nurgle’s Rot, but I preferred to create my own effect, a little different.