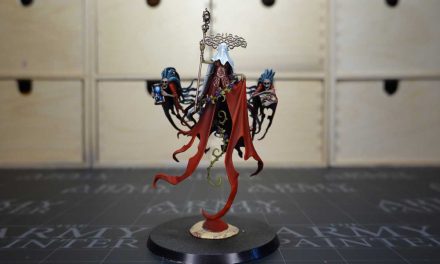

The Knight Vexillor is one of the most beautiful miniatures in Dominio, the latest set box in Warhammer Age of Sigmar. In recent days, as you have seen if you follow my YouTube channel, the friends of Ars Manufactorea have sent me their exhibition copy, making two videos to paint the Knight Vexillor.
In this article, you will learn how to paint this miniature. As you can see, I decided to use a slightly alternative color scheme to the classic Stormcast Eternal colors, substituting red for blue.
How to paint Stormcast Eternals’ Knight Vexillor
As I told you, there was so much work to do that I divided this video into two parts. In the first video we will learn how to paint the gold armor of the Knight Vexillor, and then move on to the drape. Before that, we obviously see how to give the primer and make some zenithal highlight.
How to paint the Stormcast Eternals armor for the Knight Vexillor
For the armor I used only metallic colors from The Army Painter, using different shades mixing them as needed, with a technique that could be defined as “wet blending”, that is, mixing the color directly in a wet palette or on the miniature, passing more shades. dark in the shaded areas and lighter where the light is greater.
Paint the drape of the Knight Vexillor
For the drape, on the other hand, I used reds, both from Citadel and The Army Painter, which I put on the wet palette to mix them as needed. Leaving the black directly in the deepest folds, I started with the darkest red using it as a base, and then reduced the area of paint by using progressively brighter and more orange-tinged reds. In this way, by particularly diluting the color, I was able to create progressively lighter and smaller layers of color, giving depth to the drape.
The following video is in italian, but you can actually see and follow the whole painting process.
How to paint the banner
In the second video, however, we saw how to complete the armor starting from the large banner. The colors used reflect those of the armor, but without using metallics so as not to make the two components of the miniature too similar, which are also made of different materials.
So, using the zenith highlight, I painted the background of the banner in red and the embroideries in yellow. To give depth, I used lighter colors to highlight the folds most facing the viewer. In fact, painting this banner with flat colors does not allow depth. On the contrary, if we highlight the folds so that they are lighter where they bend towards the viewer and darker where they move away from it, we are able to give a strong effect of depth and movement to the piece.
To paint the coat of arms, on the other hand, I used white that I created starting from a cold gray base, and then gave depth with a shader halfway between blue and black, properly diluted. Only then did I use white to paint the lighter parts and thus create an effect of depth. Again, painting the coat of arms white, and then using just a shader would not have created the depth needed to make the design stand out.
Painting the “plumes”
To conclude the banner, I took up the airbrush masking the rest of the miniature with a plastic bag. At this point it was enough to give a background color and a few points of light to the folds to create some depth. With the sepia shader then, I highlighted the letters.
Details, luminescence and base
To conclude the miniature, I first finished painting all those details left behind, such as the belt, the staff, the hilt of the sword. All brown elements that I then simply highlighted with a brush, without using a shader.
At this point I created some glow effects on the sword, right knee brace and left shoulder strap. I used a transparent green from Vallejo, very bright and of the right density for this type of effect. It is in fact a particularly diluted color that creeps itself into the recesses, thus creating an excellent luminous effect. To make the pupils brighter, I gave them a white point.
The base
To finish the base, I used a “desert earth” color from The Army Painter as a base, on which I then applied a brown shader and finally a little drybrush with one of the light colors used for the plumes, therefore already present in the wet palette.
Then I decorated by inserting a couple of tufts of grass which in themselves were a bit large, so I preferred to dissect them and use them separately.
Conclusions
In conclusions, I hope these videos helped you to learn more about how to paint thumbnails. Once again, I thank the friends of Ars Manufactorea for supporting me and giving me the opportunity to paint the best Games Workshop miniatures in my videos.