'/%3E%3C/svg%3E)


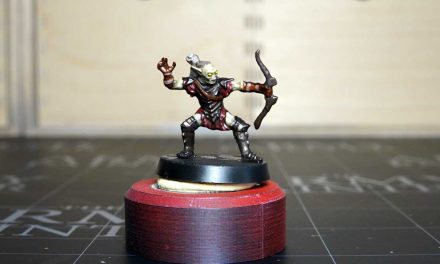
So you bought some miniatures for your first Warhammer army and decided you wanted to start painting Warhammer miniatures. But how? With which colors? And the brushes? And how do you make that effect?Read on and you’ll find out how to paint Warhammer miniatures with good results without spending a fortune.
How to paint Warhammer miniatures
Regardless of which Warhammer army you’ve chosen to start painting, this one you’re about to see is a classic pattern for painting miniatures. It will help you as a scheme to paint your miniatures at a good level of play, so as to give color to your games. However, before starting, two considerations:
- Don’t judge your results. This is a hobby that will lead you to improve yourself every time, the best miniature you will ever make is the one you still have to paint. Each miniature will take you one step further, get to know new techniques, the experience will help you have a firmer hand and choose the right colors.
- Don’t spend a fortune immediately. To begin, the advice is to buy only the colors you need for the miniature you want to start with. Avoid complete color kits, you don’t need the full range of colors and 12 different brushes. Focus on the essential to understand if this is a hobby for you. After the first step, you will have time and way to enlarge your work kit.
Step 1: Build and prepare the Warhammer miniature
When you open your first box of miniatures, you will find that they will all be taken apart in “sprue”. You will need to follow the instructions to mount them using a model glue. There will be more options to better customize your army. Choose which weapons to set on your miniatures. This will mean that when you have finished assembling them, there will be a few extra pieces, so don’t worry, you won’t have to mount them all!
Once completed, clean the miniature from production smears and excess plastics. Do not take this phase lightly, because if you leave smudges, they will be even more visible when you apply the color.
Eliminate any burrs with lime and a modeling scalpel. Then fix the miniature with patafix to a support, such as a large cork stopper, or something that allows you to hold and handle the miniature, facilitating you during painting.
Step 2: apply the primer on the miniature
The primer is an essential base color to make the colors adhere better. In fact, acrylics hardly adhere to the plastic of the miniatures. The primers can be applied with a spray reel or an airbrush, but for you who are starting out, the advice is to use the spray for economic reasons.
Primers can be of various colors, but the most common are black and white. Depending on your army, you can use a different primer. My advice is to start using black, but for example if you intend to build an army of Imperial Fists, use white because yellow is more difficult to use on black.
Step 3: basic colors
After giving the primer, you can start to lay out the basic colors for the various areas of the miniature. Then choose what color to make the various elements that compose it: hair, leather, power armor, bags, weapons, cloaks and so on. Give one or two coats of color by diluting it with water (better if distilled to avoid contamination). Depending on your army, you can find out what colors to use on the Citadel smartphone app: Citadel Color. If you use the colors of Citadel, remember that in this phase only the colors named “basic”, more suitable, should be used.
Step 4: shader
The shader is an extremely liquid and transparent color. This will allow it to settle in all the inlets and recesses of the miniature, highlighting the more exposed areas and the more internal ones in the shade.
This will give a lot of depth to your miniature that suddenly seems much more “true”. As a beginner, choose the shader that best suits your army, again following the list of colors provided by the Citadel Color app.
Shaders take longer to dry, so be careful when applying more shaders to the same miniature. Always wait until the first one is dry to apply the second one. The risk is that they will be contaminated by dirtying the miniature, thus obtaining a result that you would not want. Do not rush!
Step 5: highlighting
At this point, with a very thin brush, you can use the appropriately diluted “layer” colors, giving more light to the most illuminated areas. This will create progressive layers of color that will give light to the parts of the miniature most exposed to light. For example, if you paint the face of your miniature, you will go and apply the color on the cheekbones, forehead, tip of the nose.
Step 6: details, finishes and effects
After illuminating the miniature, you can dedicate yourself to details such as eyes, buttons, seams, or scenic effects such as coloring the base or applying a blood effect to create stains, cuts, drippings, rust effects and so on.
Conclusions
With this guide, you can begin to understand what is the process of painting Warhammer miniatures. Only by practicing and painting more can you learn new techniques and become familiar with colors and brushes. Remember: the best miniature you will paint will always be next!