
Painting Zombicide 2nd edition will surely make your games more exciting and fun. With the release in Italian of the second edition and the upcoming arrival of the Kickstarter, for those who participated, seeing how to paint the miniatures can certainly be useful for those who are approaching this new edition.
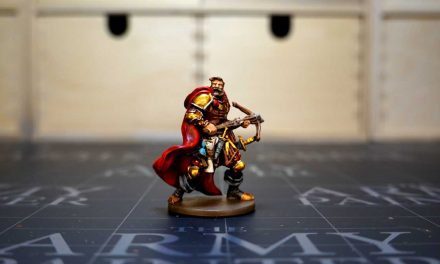
The Zombicide second edition brings with it an avalanche of novelties compared to the first, especially regarding the quality of the miniatures which are now made of a much more rigid material and with much more defined details. I have painted the entire first edition of Zombicide in the past and I can assure you that THIS Phil has nothing to do with that of the older generation.

This miniature had been presented as Kickstarter Exclusive by CMON during the crowdfounding campaign, but in the regulation it was still written that it could be proposed in other subsequent offers. This is the case of Zombicide 2nd Edition Paint Set by The Army Painter, which in addition to 20 warpaints and a brush, also contains the miniature and character sheet of Phil the policeman as a gift. The Army Painter sent me this new paint set to try it out, so I painted Phil using only the colors from the set to try it out. If you remember, I showed it to you with an unboxing a few weeks ago. If you want to see it again, find the link here at the top right.
So let’s see how to paint Phil with The Army Painter’s Zombicide 2nd Edition Paint Set.

Paint Zombicide 2nd Edition: Cleaning and priming
As always in these cases, remember to clean the miniature from the blending lines, pay attention to the cutter and try to file any excess printing. These new miniatures are well crafted, but something always remains. Pretend to clean it, it’s time for a nice sprinkle of airbrush primer. I always prefer the black one, but nothing forbids the use of a gray or a white. It depends on how you like to paint.
Spread the basic colors
Zombicide 2nd Edition Paint Set is really well composed in my opinion. It presents 20 colors, the brush and the miniature as a gift as we said. The colors consist of 2 metallics, three shaders, and a well-articulated selection of colors to create the entire base game. I started painting Phil with Dirt Splatter, a brown with which I decided to make the pants, following the illustrations on the character sheet and on the set box. In doing so, I gave preference to the parts exposed to light, using the black primer for the shaded areas. So I didn’t paint completely covering the area of the pants, but trying to create plays of light that give depth to the model.
Painting the complexion
Molotov Flame is a warm orange, perhaps a bit of a gamble to use it as a base for the complexion, but in the end it did his job well. When using these very bright colors over black primer, it is necessary to use at least two coats of color, but make sure it is well thinned so as not to create a too thick layer that can ruin the details of the miniature. Wanda Blonde is an ocher yellow that I found perfect as a base for Phil’s baseball bat. Zombie Skin, very reminiscent of The Army Painter’s Necrotic Flesh, is a light olive green. In this case, I used it as the base for Phil’s cop shirt.
Also in this case, as for the pants, I used the primer to mark the shadows, avoiding to paint the most hidden folds, for example under the armpits. Phil has a military vest, I needed a darker green than Moudly Clothes, so I had to darken it with a hint of black to put it out a bit. To vary the shades a bit, at this point I started mixing and using the colors already present in the wet palette. I thus obtained a more desaturated and clear brown, useful for the shotgun on the back and the pump-action one he carries. Same color for the gun lining and for the different straps Phil is wearing.
Arrange the shadows
I always try to leave a black border between one color and another, in order to accentuate the shadows. In the same way, I also created a dull blonde from the colors already used as the base of Phil’s hair. The color may seem light, but it’s intended because the shader will soon darken it. Filthy Suit is a light gray that I used as a base to give Phil’s black gloves some highlights and a lighter base color for the glasses. However, being too light for this purpose, I darkened it by mixing it with black.
Also this time then, I used the black primer as a base and lightened only some points with the gray thus obtained, to create some light points. Machine Gun Metal is one of the two metallics featured in the Zombicide 2nd Edition Paint Set, I used the barrels of the guns and the gun as a base. I then used the same color for the buttons of the various pockets of the gillet.
Shader
As always, after the basic colors, it is time to apply some shader, starting with the Flesh Wash, designed for complexions as per the name, which I spread on the face and arms. Finished with the Flesh Wash, I passed the Strong Tone, brown, on pretty much the rest of the miniature as I didn’t have a green shader available in the set. In fact, as already mentioned, it was my intention to paint this miniature exclusively with the colors of the Zombicide 2nd Edition Paint Set, without the use of other colors at my disposal. In other cases, I would have preferred to use The Army Painter’s Military Shader.
Highlights and final details of the thumbnail
After drying, I used the colors used again as a base to restore light to the points most exposed to the light of the various shades. I started with the complexion, first picking up the pure Molotov Flames, then diluted and mixed with the Abomination Skin. For the highlight of the pants, I used the brown obtained previously for the base color used on the weapons.
For the hair, I used Wanda Blonde giving a few strokes of light to the ends. Only in the case of the gilet did I use pure Moudly Clothes, when before I had darkened it with black. This is to contrast more and bring out the numerous pockets. As a final touch, I allowed myself a slightly special effect for mirrored glasses with Fairy Dust from the Metallic Colors Paint Set. This color makes any other color “metallic”, which allowed me to obtain a metallic shade of Zombie Skin for use on lenses.
A white line for the teeth, and that’s it.
Painting Zombicide 2nd Edition: conclusions
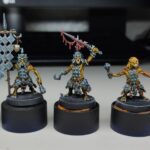
This paint set is really complete, it contains as mentioned 20 colors that are well matched to paint any miniature, whether they are survivors, zombies or miniatures of a different kind. In fact, the range covers almost all the necessary shades, with a good wet palette you can create different gradations and shades. Maybe the addition of a yellow and a gold can complete the range at best. But that’s already a great starting point to start painting miniatures!