'/%3E%3C/svg%3E)

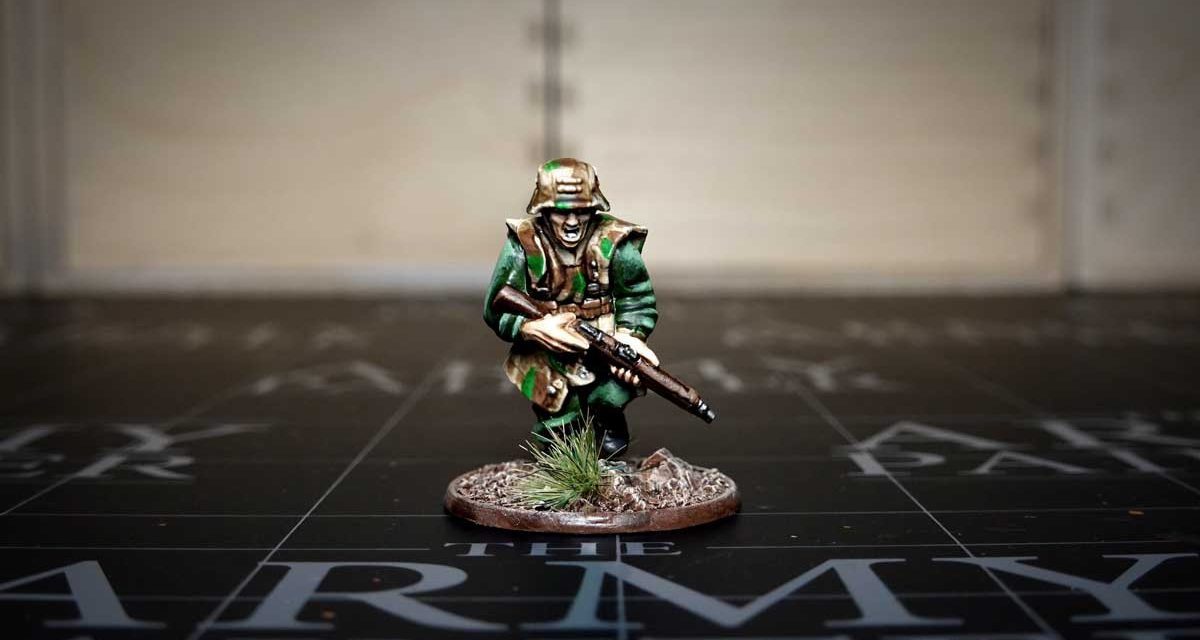
The Bolt Action german grenadiers are one of the factions that are part of the “Band of Brothers” starter set. But what is Bolt Action? Bolt Action is a Warlord Games wargame that puts you in command of the most brutal and famous battles of World War II. It allows you to assemble and paint miniatures and tanks, deploy them on a battlefield and use all your strategy, cunning and luck to defeat your opponent.
The “Band of Brothers” starter set is full of everything you need to start playing, some time ago, you may remember, we saw the very unboxing of the Band of Brothers box.
How to paint Bolt Action German Grenadiers
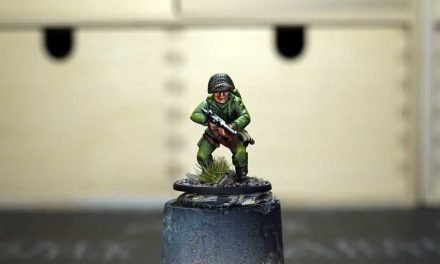
Anyone who has been playing Bolt Action for a long time knows that if you want to paint the miniatures you have to stick to the colors of the uniforms of the time. Historical reconstruction has some relevance in the game. For this reason, my miniature is not exactly what the most attentive to detail enthusiasts would like, but let’s also say it was my first time and matching the colors of a print with those you are going to paint is not exactly trivial.
All in all, the result is a miniature with colors perhaps a little too saturated, the uniform had to be more olive, desaturated and tending to gray compared to the “jungle” green that I got instead. So let’s focus on how to paint a miniature as small as Bolt Action’s, just 28mm, more than the colors themselves.
Last thing before starting: as you will see, I used the colors made available by The Army Painter, but if you have other brands at home or you want to make other choices, here is the conversion table.
How to mount a Bolt Action miniature
In the Bolt Action “Band of Brothers” box you will find the guide to assemble the German grenadiers which in turn refers to the assembly manuals. The latter are nothing more than a list of the parts present in the sprue, it is then up to you to decide how to assemble them for maximum customization. I followed the illustrations in the manual, looking for the various pieces: the torso, the arms, the head and so on.
You will need a scalpel, nippers, file and glue for this step. Once all the parts have been identified, we are going to detach them from the sprue with the nippers, being careful not to damage them. For example, I unfortunately ruined our grenadier’s weapon which, being very thin, broke and separated the piece from the sprue. So don’t be like me and pay close attention.
Once removed from the sprue, clean the residue with a cutter. Here too, maximum attention because cutting is very easy and then painting becomes difficult with a plaster on the miniature, you may have to postpone the painting for a few days and certainly none of us want to wait …
Clean all the parts, it’s time to glue them together. Do not overdo the glue, if in excess you may notice residues once it dries. After mounting the miniature, you can glue it to the base.
The Army Painter also provided me with the Battlefields Basing Set, a kit with everything I need to decorate the bases of our miniatures. So I spread a layer of glue on the base, as evenly as possible avoiding the boots of our grenadier, and then fix some pieces of cork to it, to reproduce small rocks.
I concluded it all with a sprinkling of fine grain. We will return to work on the base once we have finished the painting work on the miniature.
Coloring Bolt Action German Grenadiers: primer and base colors
For the Bolt Action German Grenadiers I decided to use a light gray primer, I’ll then fix the shadows with shaders. As the miniature is gray, make sure you’ve covered every nook and cranny. We then begin to paint the miniature with Crypt Wraith, a basic military green for the uniform of the grenadier. The Army Painter colors are often very subtle and need to be applied several coats to achieve a homogeneous color.
What colors to use for Bolt Action’s German Grenadiers
Konold Skin was my choice for the complexion of the face and hands. Here too, with a lot of patience and a brush suitable for the size of the miniature, apply more hands without dirtying the surrounding areas too much. Banshee Brown is a light brown that I found ideal as a base for the camouflage part of the uniform and the helmet. It spreads easily but a couple of coats were needed here too. Necromancer Cloak is a dark and cold gray that I used for the boots and for some small details such as the helmet strap. With simple black I painted the base of the metal parts of the gun. Too bad to have lost a part of it by cleaning it … To reach certain parts of the miniature well, as in this case, you need a handle. If you don’t have one, you can always use some old paint bottle or a large cork, fixing the miniature with patafix.
In the previous steps you will have noticed that before the primer I added a detail to the miniature, gluing a sleeping bag to the back of the grenadier. I thought of coloring it with a different green from the uniform, to give a different look to the rest of the miniature. Oak Brown is a warm brown that I used as a base for the shotgun, but also for other small details like the uniform straps. At this point I made some camouflage stains using first a very bright green, Greenskin, knowing that I would then attenuate it with the washes. Here it is important to try to give a certain uniformity to the machines, avoiding that they are present only in some areas of the camouflage and not in others.
You don’t need to be too precise, you can create the jagged shape at will, the important thing is that the color inside is homogeneous. With Leather Brown I then made the second part of the camouflage stains, creating other stains near the previous ones, in order to ensure uniformity. Dirt Spatter is an ideal brown as a base color for the sideburn. I used a larger brush in this case, trying to get the color between the inlets created by the grain.
How to apply shaders to the miniature
For purely game use, you can also use a single brown wash for the entire miniature, but if you want to get a more detailed level of shadows, you can use different ones based on the area you are making. But always remember to wait for the first one to dry before spreading the second one.
For all three washes used for this miniature, I added QuickShade Mixing Medium, to obtain more diluted and easier to apply colors.
Highlight the miniature
Highlighting the miniature at this point was an easy job, already having all the basic colors in the wet palette. With a very thin brush, The Army Painter’s Wargamer: Kolinsky Masterclass in this case, I went over all the areas in the light of the and the edges going to use the base colors, or the base color lightened with the beige of the camouflage. This is because white desaturates, better to use a color that contains yellow to lighten dark tones.
For the same reason, for the eyes and mouth I used Mummy Robes which, compared to pure white, has a hint of yellow, making eyes and teeth more “natural”, if you can say so. With some Gun Metal I gave a hint of light to the metal parts, previously painted black. Do not use color on all black areas, but rather use it to give light to the illuminated parts.
Always using the beige of the camouflage already on the wet palette, I brushed the base with a dry brush to bring out the breach and create depth. At this point, always using The Army Painter kit, I decorated the base with tufts of grass. Since the tufts are very large, I cut a tuft into 4 parts and glued two to the base.
Conclusions
Painting Bolt Action’s german grenadiers was a lot of fun. It was for me the first time with a miniature representing a “real” soldier, that is not coming from fantasy or sci-fi worlds, and I was surprisingly amused by it! I was a bit skeptical at first but I had to change my mind, painting Bolt Action will be a blast! Soon I will also paint one of the American paratroopers always from the Bolt Action Band of Brothers box, but this time trying to stick to the historical references more and with a minimum of extra attention!